Excel Activity
4:
Sleepy
Pie Chart
Essential Learning Skills: creating a
Pie Chart, comparing two groups of data, chart formats including labels,
titles, legends, moving charts on the spreadsheet, creating a footer, and
setting up portrait format.
1. Open a new Spreadsheet file.
2. Mrs. Bladderbloat recently polled all the students
attending Dweeby High School. One of the
questions she asked was, “Do you get enough sleep each night?” Enter the following information, which
represents the responses.
Enough Sleep
Yes 175
No 325
Don’t Know 40
Fill out your Excel spread
sheet so it looks like chart below, and this time instead of a bar chart, you will go
to Insert
then Pie then choose the
first 2D chart.
Once you have your chart,
double click on the title section (where it says "chart title" below) and add the title, “Enough Sleep?”
Finishing
· Click on the Insert Tab and go the the Text section and click on Text Box and and
draw a square.
· Double click on the text box and type
in your name.
· Don’t forget to print preview to
double check that your chart is just the way you want it.
· Print the page and turn it in.
Part 2 – The 3d Pie Chart
This time, you will be
using the lesson above as well as the lesson below to create a 3D Pie Chart on
your own. If you get stuck, read the
directions above to complete the lesson.
1. Open a new
Spreadsheet file by clicking on “Sheet 2” at the bottom of the page.
2. Mr. Ellis is taking a survey at Blue Grass Baptist
School on how many students have seen the new Star Wars movie “Rouge One”. So he passed around a survey that asked the
question “Did you see Rouge One?” Enter the following information, which
represents the responses.
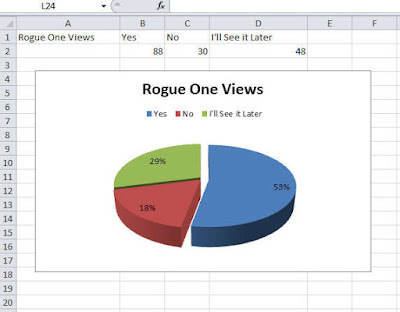
Rogue One
Views
Yes 88
No 30
Going Later 48
Note: This time you’ll be selecting the 3D Pie
Chart and under Design, you’ll be selecting the second option so that your pie
chart will look like this:
Finishing
· Click on Insert Tab go over to the Text section and click on the Text Box and and
draw a square.
· Double click on the text box and type
in your name.
· Don’t forget to print preview to double check that your chart is just the way you want
it.
·
Print
out your sheet and turn it in.


No comments:
Post a Comment